Monday, May 31, 2010

Pulk v4.0

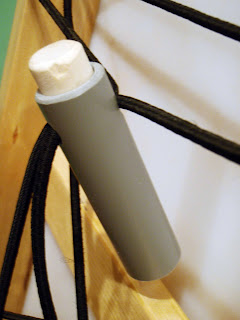
I'm adding this as an update. I think that I'm going to use a shock cord lashing system to secure the load into my pulk. It took nearly 35 feet of shock cord to "lace up" my pulk and the way I secured the ends was to use a super sized cord lock. Now the cord locks that are available for purchase are way too small! The 3/32" shock cord would never fit so I decided to make my own. I cut a one inch piece of pvc pipe to 4 inches. I then sanded down a wooden dowel to just fit in side the pipe. A 3/8 inch hole was drilled in through both. A very stiff 2" spring was sent down the pipe from the end that didn't have the dowel sticking out. To cap off the end I used a 1/2inch piece of pvc pipe. It just happens to fit very snug inside the 1 inch pipe. This plug was driven in with a mallet until the desired tension was reached. Now I am able to pull the shock cord tight and secure it with the cord lock.

Super sized cord lock

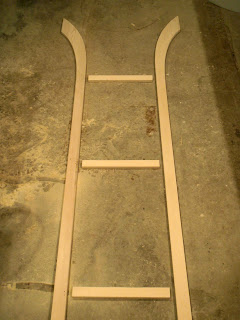
This may seem like a strange time of year to be thinking about winter pursuits but my studies have me too busy to even day dream about grand adventures let alone work on equipment. This past weekend I completed another pulk. This is the fourth version that I've made, the first was made of a 3 foot toboggan. It had molded in runners which was nice for anyone that was skiing behind me because the runners were spaced far enough apart to set a fairly decent track. The problem with it was that it was too small and I had to wear a 30 L backpack in order to bring enough gear. My second version was a 5 foot toboggan which proved to be wide enough to keep from tipping over but still not enough space. The third version was the same 5 foot sled with another attached to the top which opened like a clam shell. I had just enough room to fit gear and food for a weekend trip but anything longer than a couple of nights and I wouldn't have space and would have to resort to using a backpack again. All four pulks use a ridged pole system that is made of metal electrical conduit with swiveling brackets at the pulk end and a clasp that attached to my harness. My goal is to eventually go on extended winter camping trips that are two or three weeks in length. A friend and fellow winter camper, Bryan Saurer, even suggested a fly in trip. In order to bring enough gear for an extended trip I will need a bigger pulk which is why I build a fourth. This one measures 16" X 8' and has a 7" up-turn on the front end and weighs 21 lbs (which is more than I'd like but the supper slippery sliding surface will make up for it, at least that's what I tell myself). The sliding surface is a piece of UHMW polyethylene plastic, 1/4" thick. This material is nearly friction free on snow. In February, on a snowshoe trip to Nistowiak Falls, Bryan and I traded pulks for a while, I pulled his 10' sled which was loaded with 140 lbs of gear and he pulled my 5 foot pulk loaded with only 50 lbs. Bryan's pulled better, even with nearly three times as much weight! I was convinced at that point that I had to build a new a better pulk of my own.
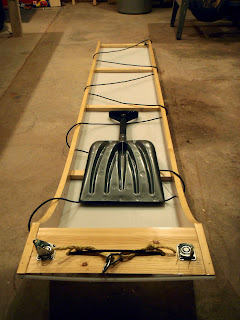
The frame pieces laid out on the shop floor

Showing the rise in the front end, frame weighs 6 lbs

UHMW polyethylene plastic before being cut to length

UHMW clamped and ready to be screwed in place

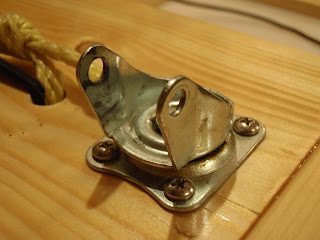
Caster bracket for an attachment point for the poles

My snow shovel. Emergency ropes extend from holes in the top board in case the poles fail.

Monday, May 24, 2010

Paddle from Poplar Bluffs

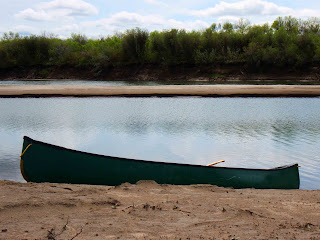
We finally had a break in the weather today so Zoe and I seize the opportunity and headed out for a paddle. We wanted to go for a little bit longer paddle and decided to put in at the Poplar Bluffs canoe launch. Poplar bluffs is a nice little conservation area managed by the Meewasin Valley Authority and is located 7 km south of Saskatoon. Directly across from the put in is Wilson Island, formerly known as Shepley Island. From 1943 to 1951 the island was used as a Sea Cadet Training Camp. The cadets were transported to and from the island on a current driven scow and activities included swimming and rowing. I've been on the island a number of times and haven't found the location of the old cadet camp.

It was good to get on the water again and spring was certainly in the air, all the trees are really becoming green and all the little goslings in their fluffy yellow down were all over the place. It's always good fun watching them scurry around on the shore.

I had a chance to try out my boat tie down anchors that I made a couple of weeks ago. I'm please to report that they work great and held fast as long as they are near a secure point under the hood. I looped the front one around the hood latch and the back one around the trunk latch.

Zoe and I stopped on a sandbar for a quick lunch.

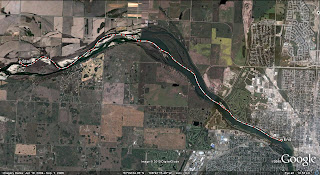
Google Earth image of our route. The distance is 7.5 km.

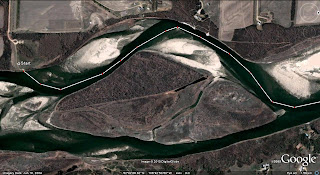
Google Image of Wilson Island. About 6 years ago when the river flooded the channel through the middle of the island (which is normally dry) had water in it. A friend and I paddled through the island which was interesting and something that I may not get to do again.

Sunday, May 23, 2010

Voyageur Paddle

I just finished carving a voyageur canoe paddle. This paddle came together much quicker than the sugar island paddle I finished a week ago, mainly because the learning curve is starting to level out. This time I used lacewood (Grevillea Robusta) for the blade and laminated it to an ash shaft. Lacewood or Silky Oak, is an exotic wood that grows in Eastern Australia. The color can very from pale brown to walnut. It has a very irregular grain that made it tough to plane because the grain tends to switch directions, forcing me to work the plane in an unorthodox manor from all directions. Having wood chip out was a constant occurrence and a lot of extra sanding was needed to sand some of the deeper chips out. Lacewood is hard and heavy, making ash seem as soft as basswood, perhaps its Latin name gives a hint to its qualities. I had purchased a 4/4 board (4 quarters or one inch) but because of the way the lumber is stored at the retailer the board had obtained a curve that had to be planed out. (I don't own a thickness sander) This meant that the final thickness of the board ended up being a little over 3/4 of an inch which isn't a problem for the blade because it was going to be shaved down to 3/8" anyway but I had intended on using the offcuts for the top grip, which were now too narrow. The solution was to laminate two pieces together to make a thick enough block and while I was gluing things anyway I decided to add a strip of ash between for an added bit of design detail. The blade measures 30" by 6" and the shaft is 31.5" long for a total of 61.5" in length. (long paddle) It weighs 902 grams. Even though the lacewood is much heavier than the ash the blade was shaved down enough to even out the weight and in the end I ended up with a paddle that is fairly well balanced.

This time I learned:
  • Using small finishing nails to align the blade while gluing helps a great deal to keep the pieces of wood from slipping around
  • Had to sharpen the plane often while working with the lacewood
  • Careful preparation of the lumbar in the beginning saves a lot of time later on when trying to work out a bend in the wood half way through the carving process
  • Handles that clamp to the ends of a strip of sandpaper keep fingers from getting shredded
  • A short piece of 1x2" with a notch cut into it works well for clamping down the rounded shaft of a paddle.
Small finishing nails used to align the blade pieces while gluing

The blade is half rough cut out, I'll go over it with a plane, rasp and sanding block to true up all edges.

The grip is roughed out, I usually leave the shaft for the end. Leaving it square provides a convenient way to clamp the paddle to the work surface.

Here I'm starting to round off the shaft by first shaving the corners down to form an octagon

A close up of the extra ash strip in the top grip

A close up of the various grain patterns in the top grip

Here you can see the irregular grain pattern in the Lacewood

The finished paddle measures 61.5 inches long

Computer drawing I made of the paddle before I started construction.

Saturday, May 15, 2010

I just built a canoe rack!

It's a hot and sunny day (Finally!) and I was lucky enough to be outside in the backyard to enjoy it. Actually being on the water or any where away from the city would be better. I just finished building a canoe rack to hold my canoes, to keep the boats off of the ground and to keep the grass underneath from dying. As you can see from the photos it was built to hold three canoes, at the moment I've only got two but I intend on building another in the not too distant future. The rack is nothing fancy, rather utilitarian in design but then it's just going to sit there in the elements. I used utility grade 2 X 4's were used to keep the cost down. While I was purchasing the lumber it occurred to me how low the price of some lumber is, granted I was buying utility grade lumber at under $2 a board, (most of the stack were bent like boomerangs) but none the less in some respects it seems as though it is under valued, considering how long it took the tree to grow to a sufficient size, then was cut in a matter of minutes. But from a consumers perspective I can appreciate a reasonably priced piece of lumber. It's just a thought that's been playing on my mind for a few days.

The rack spans 8', stands 64" tall and has 20" of clearance between the supports.

Top, is my TrailHead 16' prospector, bottom is the 17' solo boat that I built in the spring of '08.

Sunday, May 9, 2010

Hood / Trunk canoe anchors

While many newer vehicles have an anchor point underneath that is used to pull the vehicle out of a snow bank when it gets stuck, but often times this is not a convenient place to tie a rope to when securing a canoe to the top of your vehicle. This morning I made 4 canoe anchors, they are made of a 4" length of 3/4" PVC tubing, a metal ring and a loop of nylon webbing. I don't remember where I got the idea, I think that I saw it in a magazine or on the net or something like that. The PVC tubing goes just inside the hood/trunk of a vehicle. On our Sunfire there is a recess that the tubing fits nicely into. The hood/trunk is then closed with the ring end of the nylon webbing on the outside. This should provide a convinient place to secure a canoe to.

I tried them out this afternoon when i picked up my canoes and found that if they were placed near the latch on the trunk or the hood they worked well but anywhere else there was too much give in the metal. I was concerned that the force would deform the hood/trunk. On vehicles like my old jeep Cherokee that have a latch at both corners of the hood and are made of sturdier material, these would work good.


The anchor worked well when it was looped inside the trunk and around the latch.

The grey PVC tubing can be seen under the hood.

Saturday, May 8, 2010

Sugar Island Paddle

I just finished my first canoe paddle. I decided on the Sugar Island design found in Canoe Paddles, A Complete Guide to Making Your Own by Graham Warren and David Gidmark. It gets it's name from the island in the St. Lawrence that is owned by the American Canoe Association where international canoe races between European and North American paddlers were held. I made it for Zoe so, more accurately, I guess she decided on the design. As any one who knows me, knows that I can't leave well enough alone and have to modify or add my personal touch to everything and this project was no different. The offsets in the book produce an 8" wide and 24" long blade. In my opinion that is a very wide paddle, I subscribe to the school of thought that a long narrow paddle will allow you to paddle greater distances with less fatigue. Keeping in mind that Zoe is new to paddling and I felt that the 8" of blade would catch too much water causing her to tire quickly so I reduced the width to 7" X 22". I also believe that a shorter paddle shaft reduces stress on the shoulders so the length of the shaft, from the shoulder to the end of the top grip is 31.5". The edges are very fine, finer than I had intended because I had some issues with warping of the blade and had to take more material off one side to compensate. In the end I was able to work out the warp and achieve a paddle that is straight and true. Because of the warping I had to erase the guidelines that I had painstakingly marked out and continued with the project shaping the blade by eye, which I guess is a more traditional approach.

I learned a lot during the build, here is a list off the top of my head:
  • It's not easy finding a suitable piece of wood with little warp to it and a straight grain
  • A ten inch plane works great for thinning the blade
  • Aluminum oxide sand paper is way better than anything else, it lasts long and cuts fast
  • The use of a flexible straight edge would help greatly in marking out the centre lines on uneven surfaces such as the shoulders and throat
  • A wood rasp works great for shaping the top grip
  • Marking out guidelines can be very time consuming
  • building jigs and sanding blocks takes a lot of time away from the actual building of the paddle (but they only need to be made once)
Laminating the blade and grip

The blade and grip are cut

Thinning the blade with a plane

Rough shaped grip (you can see the course marks left by the rasp)

Shows how fine the edges are

The paddle is ready for a coat of varnish

Thursday, May 6, 2010

Path of the Paddle - Bill Mason

The Path of the Paddle (Solo Basic, Solo Whitewater, Doubles Basic and Doubles Whitewater) series of films produced by Bill Mason in the 1970's and 80's continue to form the foundation of paddling technique and show the skills required by any canoeist to safely navigate on the waterways of the Canadian back country.

Solo Basic


Solo Whitewater


Doubles Basic


Doubles Whitewater

Sunday, May 2, 2010

Domain name update

The domain name www.wildpaddler.ca is now directed to my paddling blog. Don't worry, wildpaddler.blogspot.com will still get you to my paddling blog.

Birch Bark Basket

Last autumn Zoe took up knitting so I decided to make a basket to hold her knitting. In keeping with a hand made theme I decided to make a birch bark basket. Collecting the materials for any project is half the fun but it takes on a whole new experience when the materials are found in nature and forces you to get outside.

On a recent outing to the Fort a la corne forest I spent some time digging in the sandy soil for roots that would be used to lash the basket together. The natives traditionaly prefered Black Spruce roots but White Spruce and Jack Pine were also used in emergencies.

A bracket with a slot in it clamped down worked well for peeling the roots that were no more than the width of a pencil and after splitting the roots were rolled for storage until they were ready for use.

Peeling the roots

Before and after peeling (black spruce and jack pine)

At the time that I collected the bark it was 1/8 of and inch thick and much too stiff to work with so I thinned it by peeling layers off until it was half of its original thickness. The next step was to make a template from a piece of paper, I then traced the pattern onto the inside of the bark.

Birch bark and pattern

After cutting the bark I soaked it in boiling water to soften it and to prevent it from cracking while bending the sides up. It's amazing how quickly and how flexible the bark becomes. (I wasn't able to get any photos of the soaking and bending process because I had to work quickly) I used clothes pins to hold everything in place.


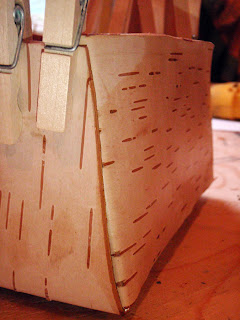
Clothes pins holding everything together while drying

When it had dried I used a three sided awl to work holes in the bark, along the corners so that I could lash the end flaps together. From what I've read a three sided awl is supposed to work better for making holes in birch bark, it doesn't split the bark like a round awl would. I quickly made an awl out of a punch that was part of a screw driver set.

Three sided awl made from a punch

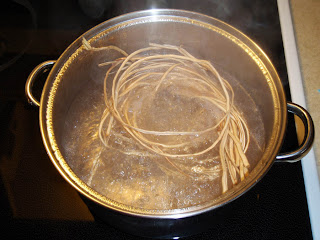
The spruce roots that I had collected earlier had dried out and were very stiff and brittle. To make them pliable again I boiled them for 5 to 10 minutes. Again it's amazing how boiling water can soften wood. (Zoe was not happy with the sticky residue that was left in the pot after I had boiled the bundle of roots) I used a double thong lashing to lace up the corners.

Boiling roots in Zoe's good chili pot
End flap secured with a double thong lashing

For the rim and handle I collected red willows which had sections that were around 1/2 inch in diameter, I peeled them and cold bent them initially to attain the rough shape then held them in place with clothes pins while I lashed them on with roots.

The finished basket

Things that I learned:
  • when selecting bark look for a tree that is completely free of imperfections, ie. small branches, bruises, blisters, splits in the bark, any little imperfection on the outside shows on the inside.
  • an ideal birch tree can be very tough to find in the woods
  • black spruce roots are very easy to split, they grow in the shape that is similar to a figure 8 and splits easily along the groove that is made between the upper and lower portions of the 8.
  • if I were to make another basket I would thin the bark even thinner, maybe to 1/32 inch.
  • birch bark and roots become very pliable when warm and moist
  • Spruce roots make a very strong lashing material and are relatively easy to dig up