Sunday, December 11, 2011

Zoe's new camp stove

Well our new camp stove just arrived in the mail a few days ago.  Now we'll have a way to heat the hot tent that I just made.  Our tent is much smaller than the standard hot tent so we decided that a smaller stove would be sufficient to heat it.  We eventually settled on the Packer Jr. made by Kni-co manufacturing.  The fire box dimensions are 10 x 10 x 12 inches, with the legs fully extended it stands 14 inches high.  We purchased the package that includes 3inch tapered stove pipe, a flew, and a spark arrestor. To keep it from rusting I painted the outside with a high temperature BBQ paint.

The first burn gets rid of any oil or residue from manufacturing

 Stove painted black

Monday, December 5, 2011

Amadou

Amadou is the soft, spongy, and flammable fibers prepared from the horses hoof fungus.  It has been used for hundreds and even thousands of years as tinder for fire starting.  Amadou was found in Otzi the Ice Man's tool kit (5000 years old).  It has even been used as a felted material for hat making. 

Looking for distractions to occupy myself with rather than studying I decided to try making some.  

While walking along the river bank with Taiga I harvested a few fungi.  Horses hoof fungus can be found on dead paper birch trees.  The amadou is a layer of spongy material just below the skin and just above the fibrous pores of the horses hoof fungus, so the first step is to shave the skin off.  The amadou shows as an orange spongy layer so I took care not to slice any of it off.  I next Sliced the amadou off in large thin slices.  The next step is to soak and boil the pieces in an ash slurry, use equal parts water and ash.  I used an old pot that I found along the river bank while on another walk with Taiga.  After boiling spruce roots for her birch bark basket in Zoe's good pot I was instructed NOT to boil anything else in her pots.  After soaking the pieces in the ash slurry over night I boiled them for 45 minutes.  The pieces are then left to dry.  I left them over night which may have been a bit too long because they turned stiff.  Any way the next step is to pound each piece to break the fibers apart which softens the material, I used the back of my hatchet and an old 2x4.  The final step is to role the pieces between your hands, to again soften the material and, to slightly fluff it up.  Using a fire steel to produce a spark and a small piece of the prepared amadou a fire can easily be lit.  The amadou doesn't flame up but instead smolders and produces a hot ember which can be used to ignite dry tinder like dry grass.  


Horses hoof fungus can be found growing on dead paper birch trees

Here I'm shaving off the outer skin or bark of the fungus.  The amadou is the brighter orange colors stuff near the end of the blade.

Amadou is very spongy and flexible and comes off in thin slices.

This image shows how much amadou I was able to get from one medium sized fungus.

Here the pieces are soaking in the ash slurry.  I noticed that the ash wanted to settle out of solution unless it was boiled then the ash particles tended to stay suspended.

Boiling the amadou on a camp stove in the shop.  Too stinky for in the house.


This photo shows the boiled and dried piece on the right compared to the finished piece on the left.  The fluffy texture of the finish material catches the spark really well.

A spark from a fire steel is all that is needed to ignite it.  I was actually quite surprised at how easily this stuff actually ignites.

This little piece smoldered for almost 5 minutes.

Wednesday, November 23, 2011

Knife Sheath

I just finished making a sheath for the Mora Belt Knife that I made a couple of months ago. I first made a paper pattern then traced it onto the back side of the leather. After cutting the piece out I wrapped it around the knife using small clamps to keep it in place. Wrapping leather around a knife is a bit trickier than I originally thought. You have to take into account the transition from the flat blade to the wider and rounded handle. When I was satisfied with how it looked I used contact cement to glue a third piece of leather in between the outer cover, along the edge where the stitches were to go. This extra piece will protect the stitches from being cut by the blade. The whole thing was stitched together then Sno-Seal finish was applied at the very end.

I used Sno-Seal to water proof the leather. Sno-Seal is made from bees wax and is nontoxic.

I used 4 - 5 oz leather, a heavier leather could have been used but I wanted to keep it as light as possible.

The snap closure in the front allows the sheath to be added to a belt without having to remove the belt in order to thread the sheath on.

Here you can see how the leather conforms to the handle with some heat and firm pressure.

The Sno-Seal changes the color quite dramatically. On the left is a left over piece of leather. Personally I like the color of the leather after treatment.

Friday, November 18, 2011

Zoe's hot tent

I realize it has been a while since my last post, school work has kept me busy but I have managed to make a hot tent for winter camping. After the stupid "F"ing cold of our New Years Eve trip last year Zoe informed me that she requires a tent with a wood stove. Well, I made her one. A tent that is, it’s based on some photos that I found on the internet. I didn’t have any plans or drawings to work from so, drawing on my experience as a graphic designer I made up my own plans using Corel Draw. Before I begin many of my projects I design them first on the computer. After making many, many, many small paper models I made a 1:25 scale model from an old bed sheet to be sure of all the dimensions. Some of the design features are the silicon stove jack, zippered vents front and back with no-seeum netting, 12 inch snow flaps, large zippered door, and many guyline anchor points. I had thought about more neutral colors like green, blue or tan but bright colors can lift a person’s mood on the days that we are forced to stay inside for hours on end due to blizzard conditions. It has many inside tie loops for hanging mittens to dry or to hang a candle lantern. The front pole is made of metal and is adjustable; in the future I intend to make a carbon fibre pole which should save some weight. The rear pole is an adjustable hiking pole. The first time we set it up nothing seemed to fit properly, none of the panels were taught and some of the snow flaps didn't even touch the ground. I thought I had screwed up but after about 45 minutes of adjusting and head scratching, it finally looked like a tent. I’m happy to say that it now only takes about 10 minutes or less to set up.

I choose to use 7.5 oz coated rip stop nylon rather than the traditional cotton canvas for a number of reasons.

Nylon pros:

· Water resistant for use in spring and fall damp weather conditions

· Shouldn’t leak when snow melts on the warmed material

· Wind proof

· Rot resistant

Cons:

· Doesn’t breath so condensation may be an issue

· Melts

· Spark holes

Cotton canvas pros:

· Breaths

· Less condensation

· Bright color

· Spark resistant

Cons:

· May leak when snow melts on the warmed material

· Rots

Specs:

Length 139”

Width 113”

Height 80” (front pole)

31” (rear pole)

Weight not sure yet, haven’t weighed it

View of the large door

One of the many guyline anchor points. (13 all together)

Front view, Zoe is standing near the back of the tent. This image shows the stove jack cover in place.

Side view, shows the modified tipi design

The front vent has no-seeum netting and zippered closure from the inside.

The silicon stove jack with the cover rolled up and secured with velcro. Now all we need is a stove.

Wednesday, October 12, 2011

Thanksgiving 2011

Our camp site is on the west shore right where the channel opens onto Crean lake

For this years annual Thanksgiving canoe trip we paddled to the camp kitchen on Crean Lake in the Prince Albert National Park. The group from left to right; Zoe and Taiga, Dave, Karen, Cathy, Cathy, Shaun, and Valery in front centre

Taiga is 5 months old and had lots of fun on her second canoe trip.

The first day (Saturday Oct. 8) was VERY windy. Environment Canada was forecasting winds of 30km/hr gusting to 50km/hr. Here we are stopped on the lee side of a point for a break from fighting the head wind. We ended up eating lunch here. It may have been windy but at least the air temperature was warm and it stayed that way for the entire weekend.

Taiga is very well behaved in the canoe, she usually just goes to sleep. Her PFD is getting too small for her. She is a lab and is a very good swimmer, she only has the PFD because it has a handle that makes it easier to haul her back into the canoe if she decides to jump ship. (which she hasn't done yet)

The evening of the first day saw the wind die down. This photo shows the view from my tent the following morning, fantastic! When I got up the temperature was 3 degrees C. Frost on everything was evidence that the temperature dropped to below freezing that night.

On the second day we set out in the canoes to explore an area called lost lake. It's a lake that is pretty well hidden from the main lake and separated by a small beach. We found an inviting beach that made a great lunch spot. There were many wolf tracks (large and small) in the sand. Notice the interesting purple sand.

Here Shaun is very serious about taking a photo of our wood pile.

When we returned from searching for lost lake Valery set to work setting up his sauna and heating large rocks over a fire. Water is poured over the rocks to produce the steam and heat. After a good soak we jumped in the lake for a cool down. I didn't take the inside temperature of the sauna but the lake water was 11 degrees C.

We usually have a large potluck style thanksgiving meal. This year it consisted of chicken cooked in a dutch oven, cauliflower, beans, mashed potatoes, baked sweet potatoes, pumpkin pie, and apple crumble, all accompanied by lots of wine. Everything is baked fresh in the woods even the pies!

Here Taiga is ready for bed tucked into her blanket inside the tent.

Shaun's rather unorthodox but effective method of packing his dry bag.

On the last day the wind had completely died and the lake was calm and warm. We took our time paddling back to the vehicles. The distance that had taken 4 hours to paddle in the wind now only took us 2 hours. We stopped to rest, we stopped for lunch, and we stopped for a second lunch.


Wednesday, September 28, 2011

Varnishing Snowshoes

Ojibway style snowshoes

While the warm weather holds I thought it would be a good time to do some maintenance on my homemade wooden snowshoes. The photo shows my snowshoes (long set) and my mom`s snowshoes (short set) which she just finished building, hanging to dry after a thick coat of varnish was applied. We put down a double layer of poly to keep the mess contained then using a good brush we liberally applied the varnish. We used a good quality spar varnish which should provide an adequate protective coating.

Sunday, September 25, 2011

I woke up yesterday morning and felt like making a canoe paddle, so I went out the my shop and prepared the pieces. I had an extra cedar / ash shaft made up from the last bunch of paddles I made so I used that and laminated walnut pieces on for the blade and top grip. I left it to cure over night. The following day (today) I did the shaping. Everything went well, I haven't played in my shop very much since I started back to school so I took my time and really enjoyed the carving process. For this paddle I choose what I call my Trapper blade design with a modified northwoods top grip. The cedar/ash shafts are very light and with the addition of the walnut blade I was concerned that the paddle would unbalanced so I decided to add the northwoods grip because it would provide more weight on the shaft and thereby balancing the paddle. I'm happy to say, it worked! The finish is oil.

Close up of my logo and the interesting light and dark grain in the walnut.


Here's a look at the modified northwoods top grip. This grip is 11" long

I cut two strips of wood off of a larger 8/4 piece of walnut that I had. I book matched the grain patterns but as I carved away the material the lighter grain pattern on the one side became less and less. I ended up with a paddle with an asymmetric grain pattern.

Monday, August 29, 2011

Mora Belt Knife

I just put the finishing touches on my latest project. I've wanted to make a knife for years but just haven't got around to doing it. Back in February I purchased a Mora knife blade from Lee Valley tools and have finally got around to making the handle for it. The handle I chose is inspired by Sami craftsmen that incorporate bone, leather, and wood in their knives. Traditionally reindeer antler would be used because of its denseness, but since there aren't many reindeer in my part of the world I used a white tail deer antler that I've had for years. The marrow isn't as dense as a rain deer's but it should hold up fine. I chose leather and walnut because their colors provide a striking contrast with the bone. I began by cutting thin slices from the antler using the band saw. The leather was cut to size along with the walnut. Holes were drilled in each piece and filed to the proper size in order to produce a snug fit. The whole works was coated with thickened epoxy and all the pieces were slid onto the tang. I used a mallet and a short piece of tubing to tap everything down tight. After letting the epoxy cure I used a belt sander to rough out the shape and finished it up by hand sanding. For the finish I used Tried & Trues varnish oil which incorporates pine resins in its formula.


Here I have a piece of antler clamped down while I drill and file the hole that will accept the tang.

All of the handle pieces are drilled and ready for assembly.

Thickened epoxy holds everything together. The blade comes sharp enough to shave with so the tape is to keeps my hands from getting cut up.

The white tail antler that I used had some interesting colored rings inside.

The handle is oiled with a varnish oil that produces a pleasing feel in the hand.

Friday, July 22, 2011

Everyone meet Taiga

I just got a new paddling and hunting buddy. On Monday July 18th Zoe and I picked up our new puppy. She`s a 10 week old yellow lab. We`ve named her Taiga which is Russian for boreal forest. It`s been a while since I`ve had a puppy and I`ve forgotten how much work it is to do the house training. She is very smart and has learned her name already and is beginning to catch on to the preliminary obedience training (come, sit, stay, fetch) that I`m doing with her. We`ve put the canoe on the ground so she can get used to it and I`m happy to say she has taken to it quite well, she`ll jump in on her own and hang out for a couple of minutes. I like to think she is a natural born canoe dog. Both Taiga and I can`t wait to begin retriever training.


Thursday, July 14, 2011

Paddling with Dragons

Zoe and I spent the day paddling on the Hillsborough River which flows through the Wilderness Park Wildlife Preserve in Tampa Florida. The preserve occupies 16,000 acres right in the middle of Tampa and is recognized as one of Florida's best places to view wild life. We rented a canoe from the local canoe outfitter Canoe Escape and decided to paddle 8.5 miles on theHillsborough River from the put in at Sargeant Park to the Trout Creek Park. The trip started out sunny and dry but after just 10 minutes on the water it started to rain. It poured again!!!! It seems that each time I go paddling it rains. What is with that, Sheeesh. We remained soaked for the rest of the day but fortunately the temperature was warm, around 80 degrees F (26 degrees C) so we stayed warm. Despite the rain we had a fantastic day on the water. The river is very picturesque as it winds lazily through swamp land. Much of the river runs under a thick canopy of vegetation, trees thick with Spanish Moss and vines hanging down into the water. There were many trees that had fallen into the water that we had to maneuver around and a couple spanned the entire river. One we had to get out and drag over and the other we were able to lay down in the canoe and float under. We saw lots of turtles, alligators, and many different species of birds. All in all this was a great way to spend the day and Zoe and I enjoyed it a great deal.

Long the river we came to a nature center called, Natures Classroom. There must have been 50 or 60 Black Vultures in the trees and on the ground.

There were many cormorants along the river. This one was particularly cooperative and stayed still as we floated by.

I am not sure what this one is but he was very focused on his fishing.

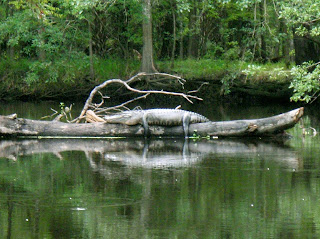
We saw many alligators on the river. This was one of the largest. The only way past him was around the end of the log he is on. He was not happy with us as we approached. He slowly slipped into the water and was not seen again.

The vegetation was amazing with all the Spanish moss hanging from the trees.

We got close enough to this alligator that we could have tapped him with our paddles. We didn't but he was still not pleased with us and he started hissing. At this time of year is their breeding season and the male become very territorial.

We found these little guys sunning themselves on a log. We didn't stick around too long cause we didn't know where the mom was. Female alligators take care of their young for up to 5 years.

Spanish moss on a tree.

We saw many turtles sunning themselves along the way. This guy was close to 12 inches long.


We had to maneuver around and under many fallen trees.

Google Earth image of the Wilderness Park Wildlife Preserve.